
Tile spacers and tile leveling spacers both sit in the grout joint, and both are sold in the same aisle, so it is easy to think they do the same job. They do not. A plain spacer controls the gap between tiles. A leveling spacer controls the gap and also pulls the edges of neighboring tiles into the same plane. This guide explains the difference, when plain spacers are enough, when you need levelers, and how to use both on the same job.
What does a plain tile spacer do?
A plain tile spacer is a small plastic piece placed between tiles to hold an even gap, or grout joint, while the thin-set cures. It sets the joint width only. It does nothing about height, so it cannot stop one tile from sitting higher than the next.
Spacers (some people call them tile separators) come in fixed widths such as 1/16, 1/8, 3/16 and 1/4 inch. They keep rows straight and joints consistent, which matters for looks and for how evenly grout fills the joint. Most are pulled out before grouting; some thin flat styles are left in, but leaving spacers in the joint can cause thin grout spots, so follow the spacer maker’s instructions.
What does a tile leveling spacer do differently?
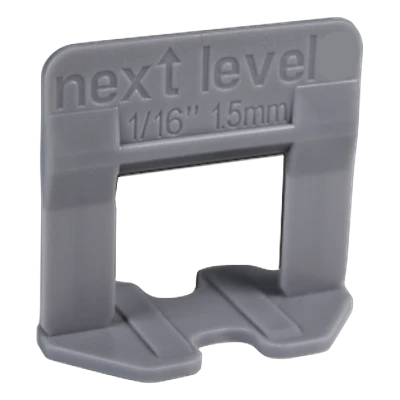
A tile leveling spacer, usually a leveling clip, slides under the edges of two tiles and is tightened from above with a wedge or cap. It holds the joint width like a spacer and clamps both tile faces to the same height, which prevents lippage while the mortar cures.
The clip has a base plate that goes under the tiles, a thin vertical section that sits in the joint and sets its width, and a slot or post above the tile surface. When you push a wedge through the slot, it presses down on both tiles at once and lifts the clip base against their undersides. After the thin-set hardens, the top of the clip is broken off at a built-in break point and the base stays hidden under the tile. Next Level break-off tile leveling spacers in three joint sizes (1/32, 1/16 and 1/8 inch) work this way with reusable wedges.
Cross, T and horseshoe spacers: when are they enough?
Cross, T and horseshoe spacers are enough for small and mid-size tile, such as mosaics, small wall tile and many 12×12 floor tiles, on a flat substrate with a joint of about 1/8 inch or wider. In that case the tile follows the floor and lippage stays within normal limits.
| Spacer type | Shape and use | Best for |
|---|---|---|
| Cross spacer | Four arms, sits where four corners meet | Grid layouts with small and medium tile |
| T spacer | Three arms, for T-junctions | Offset and brick layouts |
| Horseshoe spacer | U-shaped, slips into the joint from above | Walls, stacking, and adjusting joint width |
| Wedge spacer | Tapered strip pushed in to set a variable gap | Fine-tuning joints and holding wall tile |
| Leveling spacer (clip) | Base under the tile plus wedge or cap on top | Large format, planks, tight joints, walls in raking light |
When do you need leveling spacers instead?
You need leveling spacers when tile is large or long, when joints are tight (1/16 inch or less), when the tile is rectified with a square edge, when light will rake across the surface, or when the tile has some warpage. These are the conditions where plain spacers leave visible lippage.
Large format tile and wood-look planks are the classic cases, because a long tile bridges highs and lows and has more room to bow. Tight joints make it worse, since there is no wide grout line to soften a step. If you are not sure your job needs a system, our guide do you need a tile leveling system? walks through the decision by tile size. A complete Next Level tile leveling system pairs the clips with reusable wedges. Remember that a leveling system controls edges, not the floor: the substrate still needs to be flat within the tolerance your tile size requires.
Can you use both on the same job?
Yes. Many installers use leveling clips along the field of large tile and plain spacers where a clip will not fit, such as against walls, around a drain or at cut pieces. Clips can also be combined with regular spacers to build a joint wider than the clip itself.
The Next Level product page notes that its clips may be combined with regular tile spacers for wider joints, up to 1/4 inch. Use the clip width as the minimum joint and add a spacer where you want more. Keep the joint width consistent across the room: mixing joint sizes by accident is more noticeable than either size on its own. For help choosing the joint, see 1/16 vs 1/8 grout line and the tile leveling clip size chart.
What does each option cost per square foot?
Plain spacers are the cheaper option per square foot because they are reusable and you need few of them. A leveling system costs more because every clip is single use and you place several per tile, but reusable wedges cut the ongoing cost, and avoiding a reset tile usually pays for the clips.
Clip count drives the cost of a leveling system: smaller tile means more joints and more clips per square foot, while big tile uses fewer clips per square foot. Wedges are bought once and reused job after job. When you compare, include the cost of a callback to grind or reset a lippy floor, which is far higher than any box of clips.
Frequently asked questions
Are self-leveling tile spacers the same as a leveling system?
Usually yes. “Self-leveling tile spacers” is a common search term for leveling clips that combine spacing and leveling. They still need a wedge or cap to apply pressure.
What are the best tile spacers and levelers for floors?
For floor tile 12×24 and larger, a clip-and-wedge system in your chosen joint width is the most common choice. For small tile, plain cross or T spacers are usually enough.
Do I remove tile spacers before grouting?
Yes, in most cases. Leveling clips are broken off and plain spacers pulled before grout goes in, so the joint fills completely.
Key terms
- Tile spacer: a small plastic piece that holds an even gap between tiles while the mortar cures.
- Cross spacer: a four-armed spacer placed where four tile corners meet.
- T spacer: a three-armed spacer used at T-shaped joint intersections in offset layouts.
- Horseshoe spacer: a U-shaped spacer that slides into the joint from above and is easy to remove.
- Wedge spacer: a tapered spacer that sets a variable joint width depending on how far it is pushed in.
- Leveling spacer: a spacer that also holds adjacent tile faces at the same height, usually a clip used with a wedge or cap.
- Leveling clip: the part of a leveling system that sits under two tiles and is tightened from above to align their surfaces.
- Break-off spacer: a leveling clip designed to snap at a set point below the tile surface after the mortar cures.
- Grout joint: the gap between tiles that is filled with grout.
- Joint width: the measured distance between two tile edges, such as 1/16 or 1/8 inch.
- Tile separator: another name for a tile spacer.
- Self-leveling spacer: a common name for a leveling clip that spaces and levels tile in one piece of hardware.
- Tile gap: the space left between tiles, the same thing as the joint before grouting.
- Joint consistency: how uniform the grout joints are in width and straightness across an installation.
- Spacer removal: taking spacers or the tops of leveling clips out of the joints before grouting.
- Grout haze: the thin film of grout residue left on the tile face after grouting, removed during cleanup.
Ready to level, not just space? Next Level sells its clip-and-wedge system nationwide by quote. Ask for a quote on Next Level leveling clips and wedges and tell us your tile size and joint width.