
A tile leveling system is simple once you have done one row: clip under the tile, next tile in, wedge through the clip, snug it down. The details make the difference between a flat floor and a floor with clips that pop, wedges that crack tile, or lippage that sneaks through anyway. This step-by-step guide shows how to use a tile leveling system of the clip-and-wedge type on floors and walls, from preparation to cleanup.
How do tile leveling systems work?
A tile leveling system works by placing a clip under the edges of two adjacent tiles and tightening a wedge or cap on top. The pressure pulls both tile faces into one plane and holds them there while the thin-set cures. Afterward, the top of the clip is broken off and removed.
The clip also sets the joint width, so it doubles as a spacer. The system controls edges only: it keeps neighboring tiles flush with each other, but it cannot make a wavy floor flat. That is why the steps below start before the first clip goes down.
What do you need before you start?
Before you start, you need a flat substrate, the right thin-set and notched trowel for your tile, leveling clips in your joint width, enough wedges, and optionally leveling pliers. Plan your layout and first row before you mix mortar.
- Flat substrate: check with a long straightedge. Big tile needs a flatter floor than small tile; see what causes tile lippage.
- Thin-set mortar rated for your tile, and a notched trowel sized so the ridges collapse into full coverage.
- Clips and wedges: the Next Level clips and reusable wedges come in 1/32, 1/16 and 1/8 inch. The product page lists tile from 1/4 to 7/16 inch thick.
- Tools: margin trowel, rubber mallet, straightedge, and leveling pliers if you want consistent tension. Our tile leveling tools guide lists the full kit.
Snap your first row line, or fasten a ledger board on walls, so the first course is straight. Mix only as much mortar as you can use within its open time.
How do you place the clips under the tile?
Spread thin-set, back-butter the tile if it is large, set the tile, then slide a clip’s base plate under its edge so the clip body stands in the joint. Set the next tile against the clip body, pressing it onto the base plate so both tiles share the clip.
- Comb thin-set with straight, parallel ridges. On larger tile, skim a thin bond coat on the back of the tile (back-buttering).
- Set the first tile and push it down with a slight slide to collapse the ridges.
- Slide clips under each open edge. Their base plate must sit fully under the tile, with the clip body tight to the tile edge.
- Set the next tile onto the other half of the base plate and against the clip body, which now sets the joint width.
- Check mortar coverage now and then by lifting a freshly set tile: the back should be mostly covered, with no bare corners.
How tight should the wedge be?
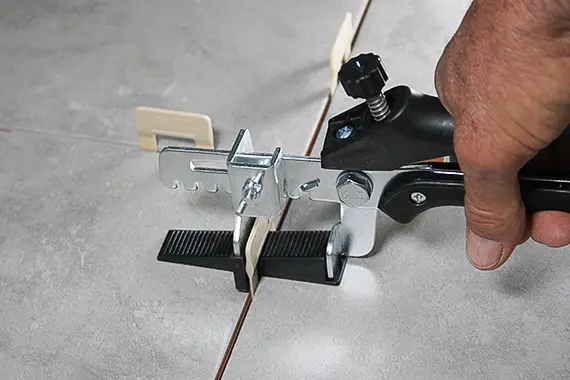
The wedge should be snug, not forced: tight enough that both tile faces are flush and the clip is under tension, but not so tight that the clip breaks early or the tile corner lifts. Pliers or a firm hand push should stop when the tiles are flush.
Slide the wedge through the clip window with the thin end first and push until it bears on both tiles. Run your fingers across the joint: if you feel a step, push a little more. Over-tightening can pull a thin tile’s edge up and leave a hollow spot or snap the clip at its break point. Leveling pliers give the same wedge tension every time, which helps on large jobs.
How many clips go on each tile?
Place clips along every edge that meets another tile, starting a couple of inches in from each corner and adding more along long edges so the edge cannot flex between clips. Large, long or thin tile needs closer clip spacing than small, stiff tile.
| Tile size | Typical clip placement (starting point) |
|---|---|
| 12×12 in | One clip per shared edge, centered or near each corner |
| 12×24 in | Two on each long edge, one on each short edge |
| 24×24 in | Two per shared edge, near the corners |
| 24×48 in and planks | Clips near every corner plus extra along long edges |
This table is a starting point, not a rule; adjust to the tile’s warpage and stiffness. For a clip count per square foot by tile size, use the tile leveling clip size chart. On walls, see using a tile leveling system on walls.
How do you remove the clips?
Once the thin-set has cured, knock off the top of each clip by kicking or tapping it with a rubber mallet in line with the joint, never across it. The clip snaps at its break point below the tile surface and the base stays hidden under the tile.
Waiting is important: pulling clips while the mortar is soft can let tiles settle. The full method, including stuck clips and walls, is in how to remove tile leveling clips.
How do you clean and store the wedges?
Collect the wedges as you break clips, drop them in a bucket of water to soften thin-set, scrub off residue, let them dry, and store them in a bag or bucket away from heat. Clean wedges slide and grip better on the next job.
Next Level wedges are designed to be reused job after job; the clips are single use. Discard any wedge with cracked teeth or a bent tip, because it will not hold tension evenly.
Frequently asked questions
How do you use leveling spacers on tile walls?
The same way as floors, but work from a ledger board up and use a non-sag mortar so tile does not slide before the clips are tightened.
Do you leave expansion joints when using clips?
Yes. Leveling clips do not replace movement joints at walls, changes of plane and large fields. Leave them as your installation method requires.
Can you reuse the clips?
No. The clip base stays under the tile. Only the wedges are reused.
Key terms
- Thin-set mortar: a cement-based adhesive spread in a thin layer to bond tile to the substrate.
- Back-buttering: spreading a thin coat of mortar on the back of a tile before setting it, to improve coverage.
- Notched trowel: a trowel with square or U-shaped notches that combs mortar into even ridges.
- Mortar coverage: the percentage of a tile’s back that is in contact with mortar after setting.
- Cure time: the time mortar or grout needs to harden enough for the next step or for traffic.
- Snap-off: breaking the top of a leveling clip at its break point after the mortar cures.
- Kick-off: removing clip tops by kicking them in line with the joint.
- Wedge tension: the downward pressure a wedge applies to tile through the clip.
- Clip spacing: the distance between leveling clips along a tile edge.
- First row: the starting course of tile that sets the alignment for the rest of the installation.
- Ledger board: a straight board fastened temporarily to a wall to support the first full row of wall tile.
- Expansion joint: a gap filled with flexible sealant that lets a tile field expand without cracking.
- Movement joint: the general term for flexible joints at perimeters, changes of plane and within large tile fields.
- Tile setting: the act of placing tile into mortar and adjusting it to line and height.
- Mortar bed: the layer of mortar the tile sits in, thin or thick depending on the method.
- Bond coat: the layer of mortar that bonds tile to the substrate or to a mortar bed.
- Open time: how long spread mortar stays sticky enough to bond tile.
- Skim coat: a very thin layer of mortar pressed into a surface or tile back to improve contact.
Need clips and wedges for your next job? Next Level ships its leveling system nationwide, sold by quote. Request a quote for Next Level clips and wedges with your tile size and square footage.