
Tile leveling tools range from a bag of clips to laser levels and lippage meters. Not all of them earn a place in your bucket. This guide sorts the tools a leveling system actually needs, the ones that make the job faster, and the ones a DIYer can skip, so you can set a flat floor or wall without buying a truckload of gear.
Which tools does a leveling system need?
A clip-and-wedge leveling system needs only three things to work: clips in your joint width, wedges, and your hands. A rubber mallet for removing clip tops and a straightedge for checking flatness complete the minimum kit. Pliers, lasers and meters are helpful extras, not requirements.
| Tool | Job in the leveling process | Must-have? |
|---|---|---|
| Leveling clips | Set joint width and hold tile edges flush | Yes |
| Wedges | Apply downward pressure through the clip | Yes |
| Rubber mallet | Beds tile and knocks off clip tops | Yes |
| Straightedge | Checks substrate flatness and tile plane | Yes |
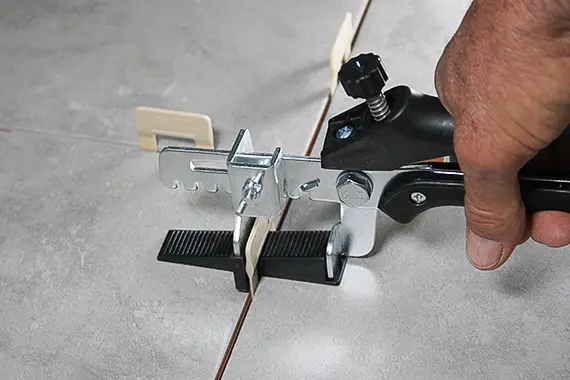
| Leveling pliers | Consistent wedge tension, less hand fatigue | Optional |
| Laser level | Layout lines and flatness checks over long runs | Optional |
| Lippage meter or gauge | Measures height difference at joints | Optional |
Keep clips in a spacer bag or box by size so you never mix 1/16 and 1/8 inch on one floor, and keep wedges in their own bucket. The reusable wedges you can tighten by hand from Next Level are designed to be used job after job.
Do you need leveling pliers?
You do not need leveling pliers to use a clip-and-wedge system, because wedges can be pushed in by hand. Pliers help on large jobs: they apply the same tension every time, speed up each row, and save your thumbs. On a small bathroom, hands are fine.
The Next Level product page describes pliers as optional and recommends them for setting wedges properly. Whatever you use, stop when the tile faces are flush; extra force can snap the clip early or lift a thin tile edge. If you are still choosing between wedge, spin-cap and strap systems, read how to choose a tile leveling system first, since each type has its own tool.
What else should be in a tile setter’s kit?
Beyond leveling tools, a tile setter’s kit needs notched trowels, a margin trowel, a bucket and mixing paddle, a level, a wet saw or tile cutter, tile nippers, a grout float, sponges and a beating block or mallet. These cover mixing, setting, cutting and grouting.
- Margin trowel: small flat trowel for mixing, back-buttering and cleaning joints.
- Notched trowels: sized to your tile so ridges collapse into full coverage.
- Tile level (bubble level): checks rows for level and plumb.
- Wet saw: makes clean straight cuts in porcelain; a manual cutter is faster for simple cuts.
- Tile nippers: nibble small curved cuts around pipes and fixtures.
- Beating block: a flat block tapped with a mallet to bed several tiles evenly.
- Grout float and sponge: pack grout into joints and clean the surface.
How do you check lippage on a finished floor?
Check lippage by resting a straightedge across the joint on the higher tile and measuring the gap to the lower tile with a feeler gauge, or by using a lippage gauge or lippage meter that reads the step directly. Check several joints and measure, rather than judging by shadows.
A tile lippage tool is cheap compared with a callback, and it settles arguments about whether a floor is within tolerance. ANSI A108.02 allows 1/32 inch on most floor tile with joints under 1/4 inch, as explained in what is tile lippage. A laser level is useful for checking the substrate before tiling, but it is not precise enough to measure a 1/32 inch step between two tiles.
Which tools can you skip on a DIY job?
On a DIY job you can skip leveling pliers, a laser level, a lippage meter, a vibration tool and a large wet saw if a rental or manual cutter will do. Do not skip a straightedge, the right notched trowel, enough clips and wedges, and a rubber mallet.
Rent the wet saw for a weekend instead of buying one. Use a long, straight level as your straightedge. Buy clips for the square footage plus some extra for waste and cuts; the clip size chart helps you estimate. When you are ready to set, follow how to use a tile leveling system step by step.
How do you look after leveling tools between jobs?
Clean wedges, trowels and pliers the same day, before mortar hardens on them. Soak wedges in water and scrub them, wash trowel notches so they keep their depth, wipe pliers jaws, and store clips dry and sorted by size so the next job starts with the right joint.
Worn trowel notches put down less mortar than the label suggests, which quietly lowers coverage on the next floor. Check them against a new trowel now and then and replace them when they wear. Wedges with stripped teeth or cracks hold less tension, so pull them from the bucket. A straightedge that has been dropped can bend; sight down it or check it against a known straight surface before you trust it on a big tile job.
Frequently asked questions
What is a tile leveler tool?
Usually it means a leveling system: clips and wedges or caps that hold tile edges flush. Sometimes it means the pliers used to set the wedges.
Are ceramic tile leveling tools different from porcelain ones?
No. The same clips and wedges work on both; what changes is the joint width and the tile thickness the system supports.
Do I need a laser level to tile a floor?
No. A long straightedge and a good bubble level are enough for most rooms. A laser helps on large open floors.
Key terms
- Rubber mallet: a soft-faced hammer used to bed tile and knock off leveling clip tops without chipping.
- Margin trowel: a small rectangular trowel for mixing, buttering and detail work.
- Straightedge: a long, true bar laid across a surface to find highs, lows and steps.
- Laser level: a tool that projects a level or plumb line for layout and flatness checks.
- Tile nippers: pliers-like cutters that nibble small pieces from tile for curved cuts.
- Wet saw: a power saw with a water-cooled diamond blade for clean tile cuts.
- Grout float: a rubber-faced trowel used to press grout into joints.
- Sponge: a dense tile sponge used to shape joints and clean grout off the tile face.
- Beating block: a flat padded block tapped to bed several tiles into mortar evenly.
- Tile level (bubble level): a spirit level used to check tile rows for level and plumb.
- Lippage meter: a gauge or dial tool that measures the height difference between tile edges.
- Spacer bag: a bag or box that keeps spacers or clips sorted by size on the job.
- Bucket of wedges: a working supply of reusable wedges, kept separate so they can be cleaned and reused.
Building your leveling kit? The Next Level tile leveling system ships nationwide, sold by quote. Ask for a quote on clips and reusable wedges.